
Maintenance instructions
Non-filter type OMC-N3 series
Cautions
- Before carrying out any maintenance work, turn power off and make sure that the motor has stopped rotation.
- Put on gloves to protect your hands from injury.
- Motor frame can be very hot. Do not touch it with bare hands.
- Check for dirt of Collection unit, Rectification demister and housing interior every month or at least quarterly basis.
When excessive dirt is found, carry out cleaning or replacement.
Cleaning of Collection unit
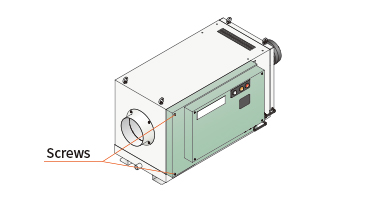
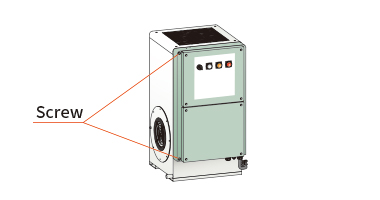
1. Remove the screw and unlock the two draw latches to open one of the Access Doors whichever easy to open.
Access Door can be detached by pulling it up once opened.
Access Door can be detached by pulling it up once opened.
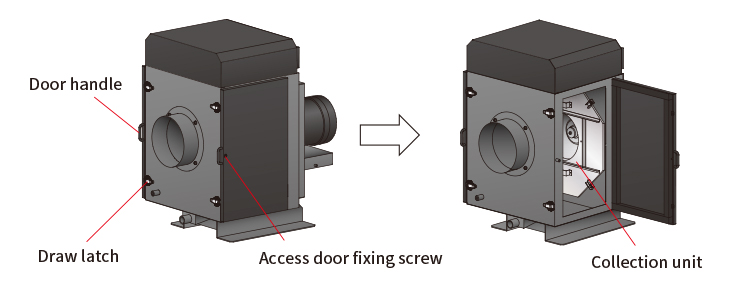
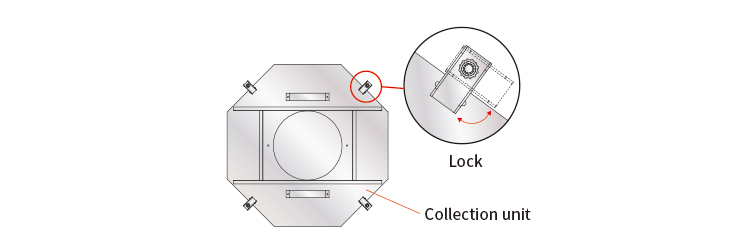
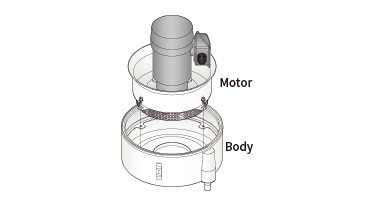
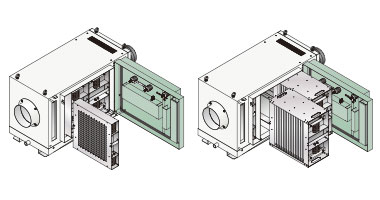
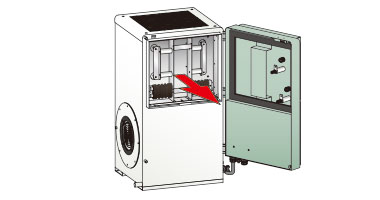
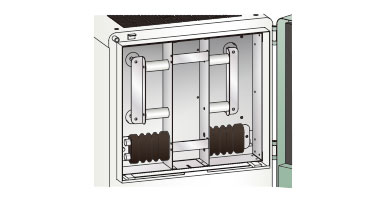
2. Unlock Collection unit by turning the four locks 90 degrees and then take it out.
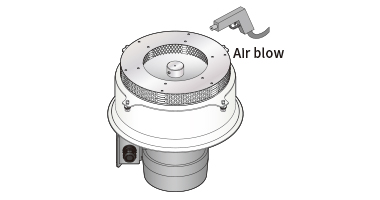
3. Clean the Collection unit by means of compressed air or a brush. For heavy dirt, steep the unit in a washing liquid for a while.
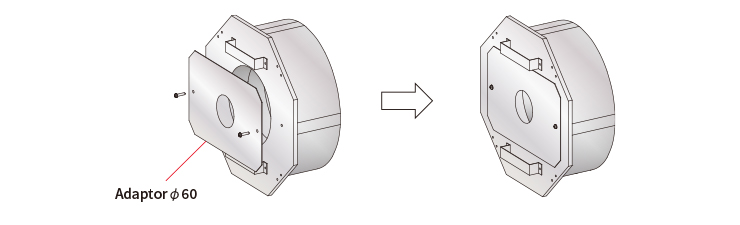
For OMC-N305(H), do not forget to reattach the adaptor Ø 60 if it was detached for cleaning.
For OMC-N305(H), do not forget to reattach the adaptor Ø 60 if it was detached for cleaning.
4. For reattaching the Collection unit, position it to fit the guide of octagon rim and secure the four locks.

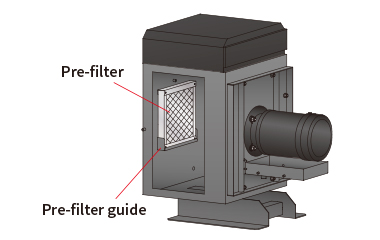
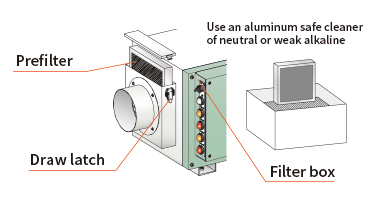
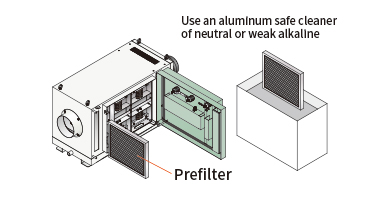
Cleaning of Pre-filter
- Take out the Pre-filter attached with magnet.
- Clean the Pre-filter using an air blow gun or a brush. For heavy dirt, steep the filter in a washing liquid for a while.
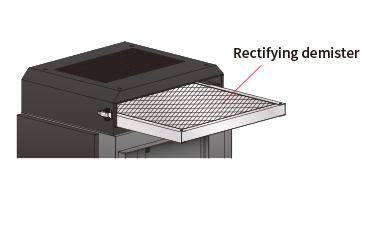
Cleaning of Rectifying demister
- Unlock the two draw latches to remove the rear cover and then take out the rectifying demister.
- Clean the demister with detergent.
Non-filter type OMC-11
Cautions
- Before carrying out any maintenance work, turn power off and make sure that the motor has stopped rotation.
- Because of its filterless construction, OMC-11 basically does not require frequent maintenance work. However,
it is recommended to check clogging of the vane every 6 months or more often. In case the pores are heavily clogged, disassemble the vane for cleaning. - Motor frame can be very hot. Do not touch it with bare hands.
- Do not forcibly pull, bend or pinch the power cable.
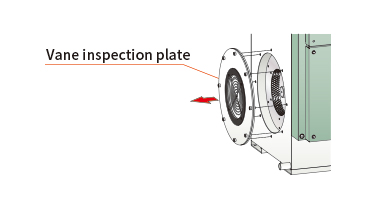
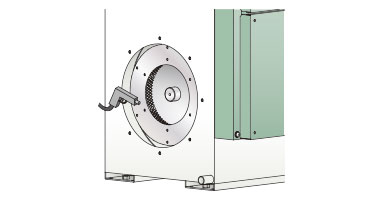
Cleaning of vane and interior
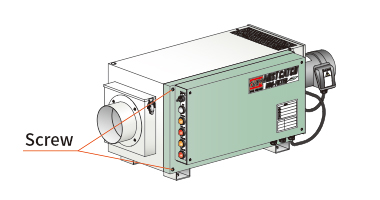
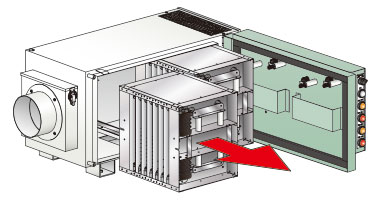
1. Loosen 4 screws (M6) to pull out the motor.
Tools used: Hexagon wrench (5 mm)
Tools used: Hexagon wrench (5 mm)
2. Wipe dirt off the inner surfaces using a waste cloth. Clean the openings of the vane by blowing compressed air or by wiping with a waste cloth.
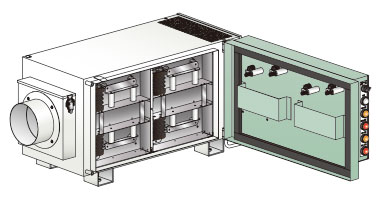
Electrostatic type OMC-E310/E315
- Check the electrodes every three months and carry out cleaning if they are dirty.
- Carry out cleaning of the electrodes and the insulators when Electrode Check lamp blinks or lights up.
Cautions
- Before carrying out any maintenance work, turn power off and make sure that the fan has stopped rotation.
- For prevention of electrical shock, let MISTCATCH discharge static electricity for at least 30 seconds after power shutdown and then carry out work.
- Dry out the electrodes after cleaning and then remount.
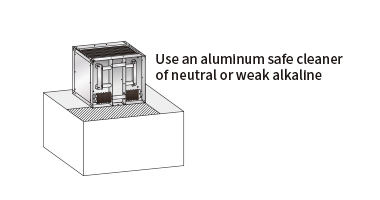
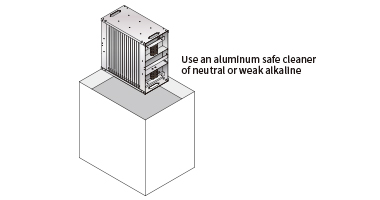
- Use neutral or weak alkaline detergent for washing electrodes and fan.
- Do not forcibly pull, bend or pinch the power cable.
- Put on gloves to protect your hands from injury when carrying out maintenance work.
Cleaning of Electrode
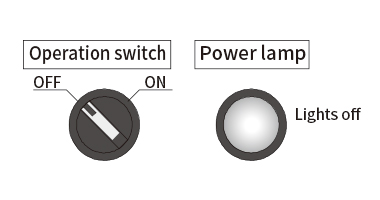
1. Turn the operation switch off to disconnect power. Leave the unit at least 30 seconds until its motor stops.
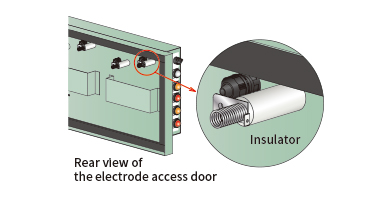
2. Loosen the 2 M6 screws to open Electrode Access Door.
3. Take electrodes out.
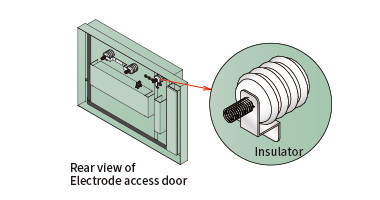
*Do not hold the insulators for taking out electrodes. It can break insulators.
*Do not hold the insulators for taking out electrodes. It can break insulators.
4. Soak the electrodes in cleaning liquid. Use a brush for removing tough stains. Use of an ultrasonic cleaner or hot water makes cleaning work easy.
*Pay attention not to deform the needle electrodes with a brush.
*Pay attention not to deform the needle electrodes with a brush.
5. Dry the electrodes completely after washing.
*Operating a MISTCATCH with wet electrodes can lead to sparking.
*Before attaching the electrodes, make sure that the unit and the needles are not deformed and free from foreign matters.
*Operating a MISTCATCH with wet electrodes can lead to sparking.
*Before attaching the electrodes, make sure that the unit and the needles are not deformed and free from foreign matters.
6. Put the electrode back in place. Push it in to the depth in the direction as illustrated below.
7. Close the Access Door and fix the two M6 screws.
Cleaning of unit interior
Wipe off dirt from the insulators and the surrounding part of them using a waste cloth.
Cleaning of Pre-filter
1. Unlatch the two draw latches to detach the filter box. Then take out the Pre-filter.
2. Soak the Pre-filter in cleaning liquid to remove dirt.
3. In case the filter is clogged with machining swarf or oil, blow dirt off by compressed air.
2. Soak the Pre-filter in cleaning liquid to remove dirt.
3. In case the filter is clogged with machining swarf or oil, blow dirt off by compressed air.
Electrostatic type OMC-E325/E345
- Check the electrodes at least every three months and carry out cleaning if they are dirty.
- If any of the alarms E1, E2, E3 or E6 was displayed, carry out cleaning of the electrodes and the insulators.
Cautions
- Before carrying out any maintenance work, turn power off and make sure that the fan has stopped rotation.
- For prevention of electrical shock, let MISTCATCH discharge static electricity for at least 30 seconds after power shutdown and then carry out work.
- Dry out the electrodes after cleaning and then remount.
- Use neutral or weak alkaline detergent for washing electrodes and fan.
- Do not forcibly pull, bend or pinch the power cable.
- Put on gloves to protect your hands from injury when carrying out maintenance work.
Cleaning of Electrode
1. Press the STOP button on the operation to disconnect power. Leave the unit at least 30 seconds until its motor stops completely.
2. Loosen the two M6 screws to open the Electrode Access Door.
2. Loosen the two M6 screws to open the Electrode Access Door.
3. Pull the handle of the Charge Electrode to take it out. Then, take out the Collection Electrodes in the same manner.
*Do not hold the insulators to take out electrodes. It can break insulators.
*Do not hold the insulators to take out electrodes. It can break insulators.
4. Soak the electrodes in cleaning liquid. Use a brush for removing tough stains. Use of an ultrasonic cleaner or hot water makes
cleaning work easy.
*Pay attention not to deform the needle electrodes CAUTION with a brush.
cleaning work easy.
*Pay attention not to deform the needle electrodes CAUTION with a brush.
5. Dry the electrodes completely after washing.
*Operating a MISTCATCH with wet electrodes can lead to sparking.
*Before attaching the electrodes, make sure that the unit and the needles are not deformed and free from foreign matters.
6. Put the electrode back in place.
7. Close the Electrode Access Door and then tighten the hex head cap screws securely.
Cleaning of unit interior
Wipe off dirt from the insulators and the surrounding part of them using a waste cloth.
Cleaning of Pre-filter
1. Loosen the hexagon head bolts to open the Electrode Access Door.
2. Soak the Pre-filter in cleaning liquid to remove dirt.
3. In case the filter is clogged with machining swarf or oil, blow dirt off by compressed air.
2. Soak the Pre-filter in cleaning liquid to remove dirt.
3. In case the filter is clogged with machining swarf or oil, blow dirt off by compressed air.
Electrostatic type OMC-E21
- Clean electrodes and insulators at least every three months or when the Electrode Check lamp blinks or lights up.
- When suction power has declined, carry out cleaning of the vane.
Cautions
- Before carrying out any maintenance work, turn power off and make sure that the fan has stopped rotation.
- For prevention of electrical shock, let MISTCATCH discharge static electricity for at least 30 seconds after power shutdown and then carry out work.
- Dry out the electrodes after cleaning and then remount.
- Use neutral or weak alkaline detergent for washing electrodes and vane.
- Do not forcibly pull, bend or pinch the power cable.
Cleaning of Electrode
1. Turn the operation switch off to disconnect power. Leave the unit at least 30 seconds until its motor stops completely.
2. Loosen the 2 screws to open the Electrode Access Door.
3. Take the electrode out.
*Do not hold the insulators to take out the electrode. It can break insulators.
*Do not hold the insulators to take out the electrode. It can break insulators.
4. Soak the electrode in cleaning liquid. Use a brush for removing tough stains. Use of an ultrasonic cleaner or hot water makes cleaning work easy.
*Pay attention not to deform the needle electrodes with a brush.
*Pay attention not to deform the needle electrodes with a brush.
5. Dry the electrode completely after washing.
*Operating a MISTCATCH with wet electrode can lead to sparking.
*Before attaching the electrode, make sure that it is not deformed and free from foreign matters.
*Operating a MISTCATCH with wet electrode can lead to sparking.
*Before attaching the electrode, make sure that it is not deformed and free from foreign matters.
6. Put the electrode back in place. Push it in to the depth in the direction as illustrated below.
7. Close the Electrode Access Door and fix the 2 screws.
Cleaning of Vane
1. Loosen 8 bolts (M5) to detach the Vane cover plate.
Tools used: Hexagon wrench (2.5mm)
Tools used: Hexagon wrench (2.5mm)
3. Wipe dirt off the pores of vane using a waste cloth or or a air blow gun.
Filter type
- Check filters at least every three months and clean or replace them if they are dirty.
- When suction power has declined, carry out filter maintenance.
Cautions
- Before carrying out any maintenance work, turn power off and make sure that the motor has stopped rotation.
- Motor frame can be very hot. Do not touch it with bare hands.
- Do not forcibly pull, bend or pinch the power cable.
Replacement of Filters
The filters are washable and reusable a couple of times.
Primary filter
1.Detach the duct hose from the suction port.
2. Unscrew the round Primary filter behind the suction port and take it out.
2. Unscrew the round Primary filter behind the suction port and take it out.
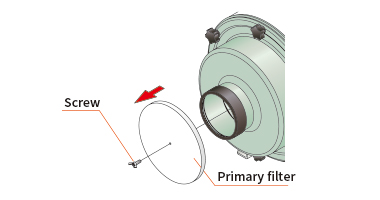
3. Clean or replace the filter and reassemble it in the reverse order.
Secondary and Tertiary filters
1. Detach the knobs that fix the exhaust port cover to take out the cover and the Tertiary filter.
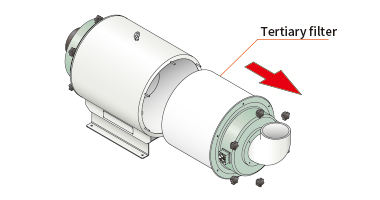
2. Then, remove the Secondary filter located behind them. Secondary filter consists of three filters.
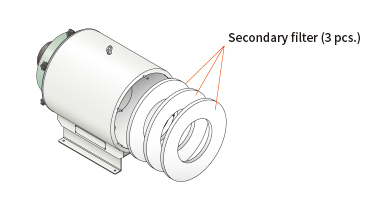
3. Clean or replace the filters and reassemble it in the reverse order.
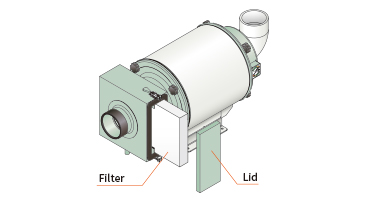
Cleaning of Chip separator
1. Loosen the clamps on top and bottom of the Chip Separator to remove the lid.
2. Take out the filter from the Chip Separator interior.
3. Eliminate cutting chips and swarf of the Chip Separator interior.
4. Clean or replace the filter and reattach it to the original place in the Chip separator.
5. Put the lid back on.
2. Take out the filter from the Chip Separator interior.
3. Eliminate cutting chips and swarf of the Chip Separator interior.
4. Clean or replace the filter and reattach it to the original place in the Chip separator.
5. Put the lid back on.